Passive Solar house Design project overview
This lengthy 2 1/2 month project was designed to teach us about heat, thermodynamics, daylighting techniques, and alternative energy sources. The several parts of this project include : hot water heater, solar house design, site selection, materials testing lab, wind turbine lab, justification about alternative energy sources, cold frame, and north window reflector.
Hot Water Heater
The first step of this project was to make a solar water heater that would heat any volume of water of our choosing (800 mL) for 20 minutes. This experiment helped us learn about heat transfers like conduction, convection, and insulation.
We used several materials to construct our design:
1 ft of copper tubing
1 shoebox
1 roll of masking tape
2 ft of saran wrap
2 ft of aluminum foil
1 ft of plastic tubing
1 liter bottle
1 sheet of bubble wrap
2 newspapers
To operate and use our solar water heater, we would pour the water into the liter bottle, let it run through the plastic and copper tubing, catch the water in a canteen on the other side, and then repeat the process. This process works because of the radiation from the sun heats the copper tubing so as the water runs through it, it conducts heat into the water.
On the day of testing, we realized that there was a major issue with our solar water heater: it was not water tight. Throughout the next 20 minutes, we scrambled around trying to keep the water from leaking, but with no prevail. At the end of it all, we had only increased the temperature of our water by 3 degrees Celsius (19-22 degrees Celsius) and lost 300 mL of water, leaving us with only 500 mL left. The loss of water meant that we lost a lot of heat, not to mention, we had the class period early on a cool, winter morning which could have taken the heat away from the water once it was exposed to the cold air.
Daylighting Activity
We designed a cardboard model of a house that decreased the usage of electricity and artificial light by using day lighting techniques like these:
Clerestory windows - high windows above eye level that admit light in
Light shelfs - horizontal surface that reflects light deep into a building
Skylights - light transmitting window that takes up a portion or all of the ceiling
Solar Tubes - used for distributing and transforming light for a purpose of illumination
Our unique 100 square foot circular house worked not as well as I thought it would. In certain points of the year and day, our house worked perfectly, but other times, there would have very minimal lighting. You have to take into account that our aluminum foil solar tubes and light shelves don't work as well as they would in real life, but our house needed major adjustments.
Site Selection
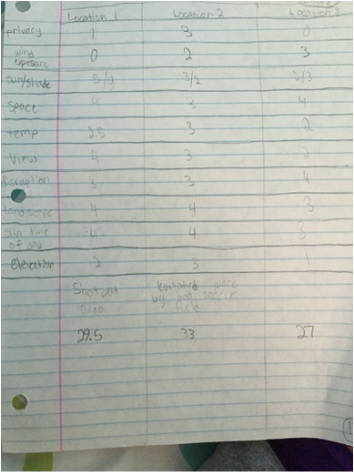
We were supposed to choose a location where we would locate our solar house on the San Marin campus. Last years' STEM students had already built a house so we were doing this as a learning opportunity and for our theoretical house. My group debated between three possible sites: the lot near the art building, the space behind the shot put area, and an elevated place near the back of the crappy soccer field. We chose the uplifted area next to the crappy soccer field location because it had the best privacy, most space, minimal disruption, didn't receive too much light or shade, and had a pretty good view.
Materials Testing lab
Before designing a cold frame and north window design, we had to test materials for the best conductivity, insulation, and absorption. As a class, we designed a procedure to do so.
Procedure:
1. Place tested material on a corrugated piece of cardboard to insulate from counter top
2. Place 1 square foot of tested material 12 cm below a 60W incandescent light bulb
3. Take initial temperature of test material
4. Turn on the light bulb
5. Take temperature every 5 minutes for 20 minutes
6. Turn off the light bulb
7. Take temperature every 5 minutes for 20 minutes
8. Find total temperature gain and loss for each material
9. Compare materials and analyze data
My group and I were given tar paper, rubber, and terracotta pot to test for conductivity and insulation. After finishing testing, as a class, we went over the results. The lab ended inconclusive due to the amount of experimental error through the course of those 40 minutes. Some groups forgot to put the cardboard underneath their material which caused them to lose heat that was gained, materials were uneven so the surface wasn't exactly 12 cm below the light bulb, and while taking temperatures, people took it at different locations every time, varying the results. But we have to take into consideration that we weren't in a sterile lab spending countless hours perfecting the lab; we are in a classroom with minimal supplies and high schoolers, for god's sake. There is bound to be mistakes and we have learned that we can control some variables, but not all of them.
Cold frame design
Cold frames are boxes are placed on the ground over plants to keep them alive and thriving during the winter months. We were given the task of designing one that the garden club could use to alleviate the failing garden at San Marin. My group and I didn't want to build the same type of cold frame every other group was doing, which was the box; we built a cold frame with a triangular design. The judges loved it, but I wish we, on our flap that would open and close, had made it out of plexiglass so that when it was closed light could still get through. But hey, you have to go bold to keep out the cold. (Sorry, some of the pictures ended up positioning sideways in the slide shown below.)
North window reflector design
This project, to my group, was an after thought. Shasta and I were focused so much on the cold frame that we did not realize our other two members had barely done anything on the other idea or contributed anything at all. It was such a mad dash at the end to construct a prototype and prepare a presentation that our idea was not well thought through at all and you could tell our presentation had not once been practiced. Let's just say our reflector was a bust.
| cold_frame_presentation_-_google_slides.html |
Justification
In this task, as a class we created a google document explaining why we were doing this project in the first place. I was unfortunately not there because I was getting my braces off, but after reviewing over it I can see and understand that this document outlines energy consumption, types of energy, greenhouses gases, and so on. You can view our justification paper here.
Wind Turbine Lab
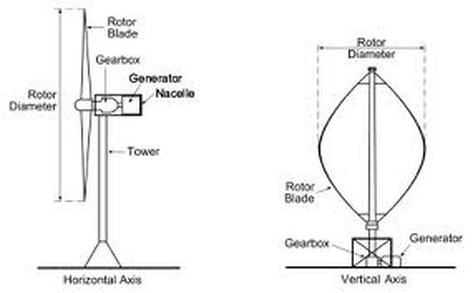
The point of this two day lab was to teach us about alternative energy sources like HAWT's and VAWT's. We constructed our own idea of what we think the most efficient wind turbine was for each type. Our group used tinker toy rods an manila folder and tested our designs with a fan and leaf blower. We weren't exactly successful in this portion of our project. Our VAWT didn't move at all and we were unable to have time to go back and tweak it. Our HAWT, on the other hand, was mediocre, but miles better than our other design.
Concepts
Heat - energy in a transfer
Temperature - a comparative measurement of hot and cold
0th law of thermodynamics - If two thermodynamic systems are each in thermal equilibrium with a third, then they are in thermal equilibrium with each other.
1st law - matter and energy are conserved
2nd law - entropy always increases
3rd law - absolute zero is unattainable
Conduction - transfer of heat through solids
Radiation - transfer of heat through waves
Convection - transfer of heat through fluid
Ideal gas law - any change in internal energy results in a change in temperature
Specific heat - quantity of required to raise the temperature of a unit mass of a substance by one degree Celsius
Bernoulli's principle - fluid pressure decreases as pressure increases
Archimedes principle - an immersed object is buoyed up by as force equal to the weight of its displaced fluid
Boyle's law - pressure and volume are indirectly related
Pressure - force over an area
Insulation - inability to transfer heat
Solid - state of matter with very little particle movement
Liquid - state of matter that can flow but not float
Gas - state of matter which can flow and float
Buoyancy - weight of water from displacement
Reflection
This project, for my group, went very poorly. There are a few contributing factors for the poor work my group put forth. For one we had no sense of time. For example, at the beginning of the cold frame and north window reflector mini project, we procrastinated like crazy. It was in our heads that we had a few more weeks to work and it was no big deal if we slacked off. When we realized how far behind we were, we had little to no motivation to complete the task at hand. We also failed miserably at distributing the work evenly. Shasta and I focused all our time and energy on the cold frame while Donnie and Jared hadn't even touched the idea of the reflector, but were becoming masters of Trivia Crack. It was a complete and utter mess.
One of the big takeaways from this project, and every other project we have had this year, for me is time management. My god, I love to procrastinate! It was evident in this last project and it's evident in this website update, which I decided to do the night before the due date. Every activity or lab in this project came down to the last minute for my group and I. Not once did we finish early or for the final project, have enough time to practice the presentation. Shasta and I did the best we could while the other two members of our group sat around, but at times, I was just as bad as them. No matter what project I am given, I have to focus my time and energy to complete the task so I can put my best work forward.
Pits:
I already listed some of my pits, but here they are again:
1. We had a lack of motivation throughout the project.
2. We loved to procrastinate and that caught up with us in the end.
3. Our group did not cooperate and work as a unit to get the job done.
Peaks:
It was not all in vain. First, our cold frame ended up being one of the top three options for the garden club and a fairly good presentation for it. Second, by the end of our project, we were working slightly better as a group and made up up a lot of ground in a short period of time. Finally, I've learned some important lessons about time management and I know I can only grow for the projects to come.
